


Saito's New Engine: FG-90R3
 11-18-2019, 05:18 PM
#301

My Feedback: (48)
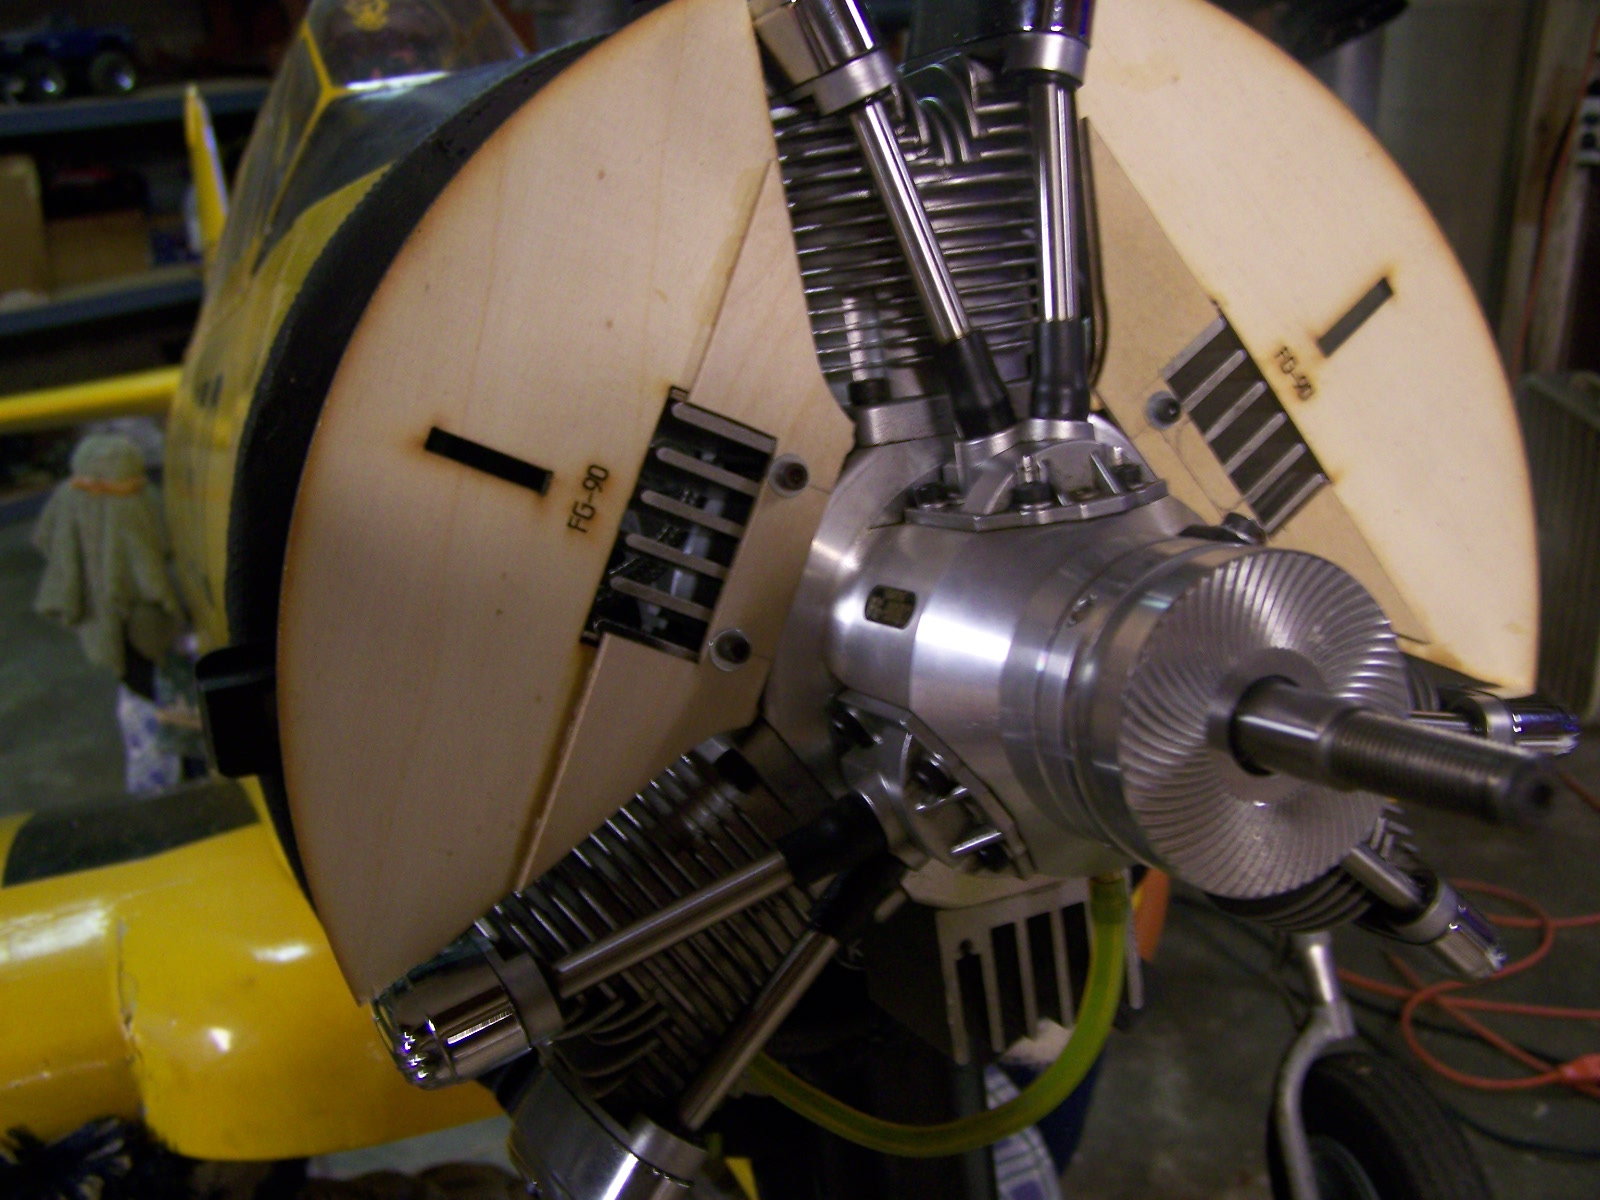
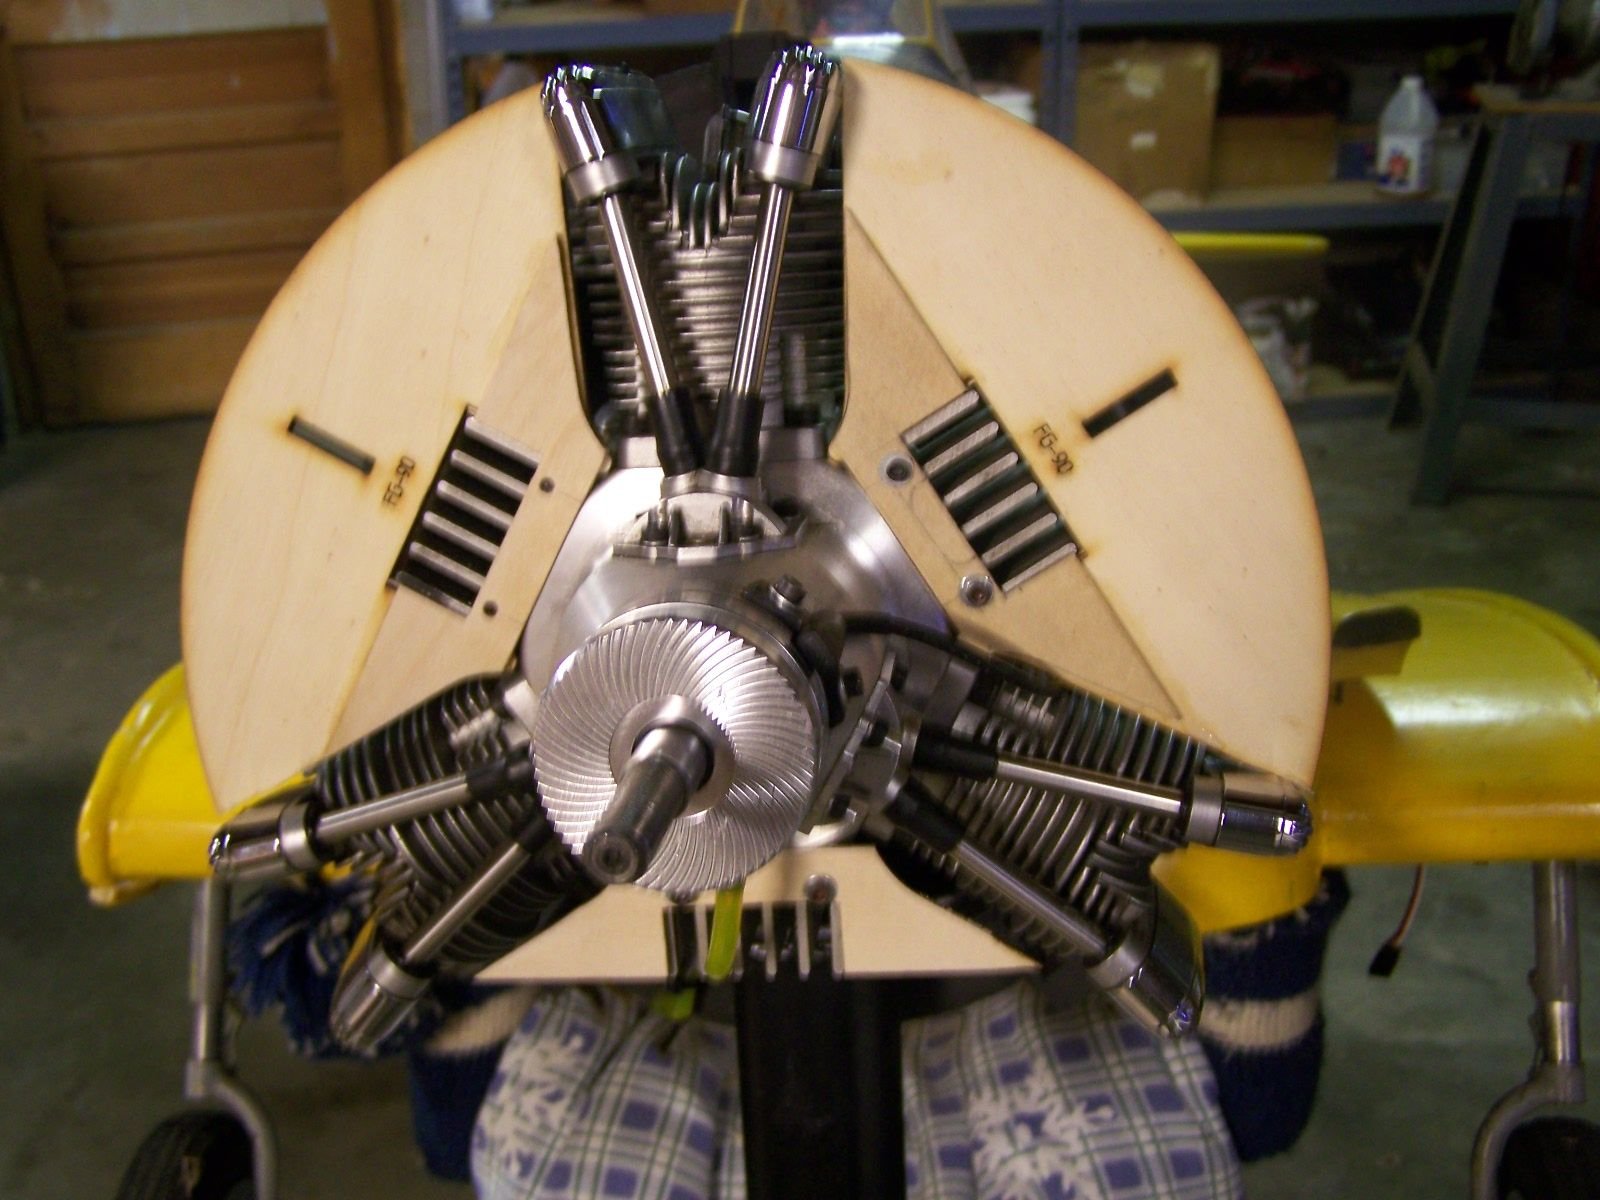
I haven't seen much activity of this thread lately, but I wanted to share a alternative method of installing baffles on the FG-90 that I came up with. I bought and mounted this engine on a Ziroli AT-6 which turned into quite a bit of fun, the FG-90 being about 2 inches longer than the Brison 4.2 it replaced. I ordered the baffles from Keleo, but I wasn't to thrilled about mounting them in the cowl, I prefer them mounted to the engine, but they need to be removable of course. Looking at the heat sinks I noticed a relief machined into the two outer fins at the base which turned out to be just right to thread a 4-40 bolt into. I built a box out of light ply to snug the baffle up on the heat sink, and a lower part to bolt to it. Mount the lower part with the bolts, then position the baffle and glue together. Works great and only takes a minute to remove/reinstall as needed. I think this method also gets the baffle tighter to the cylinders also putting air where you want it.
Anyone else put one of these engines in a Ziroli AT-6? I found a short thread about one with a 450, but no details or pictures on how it was done.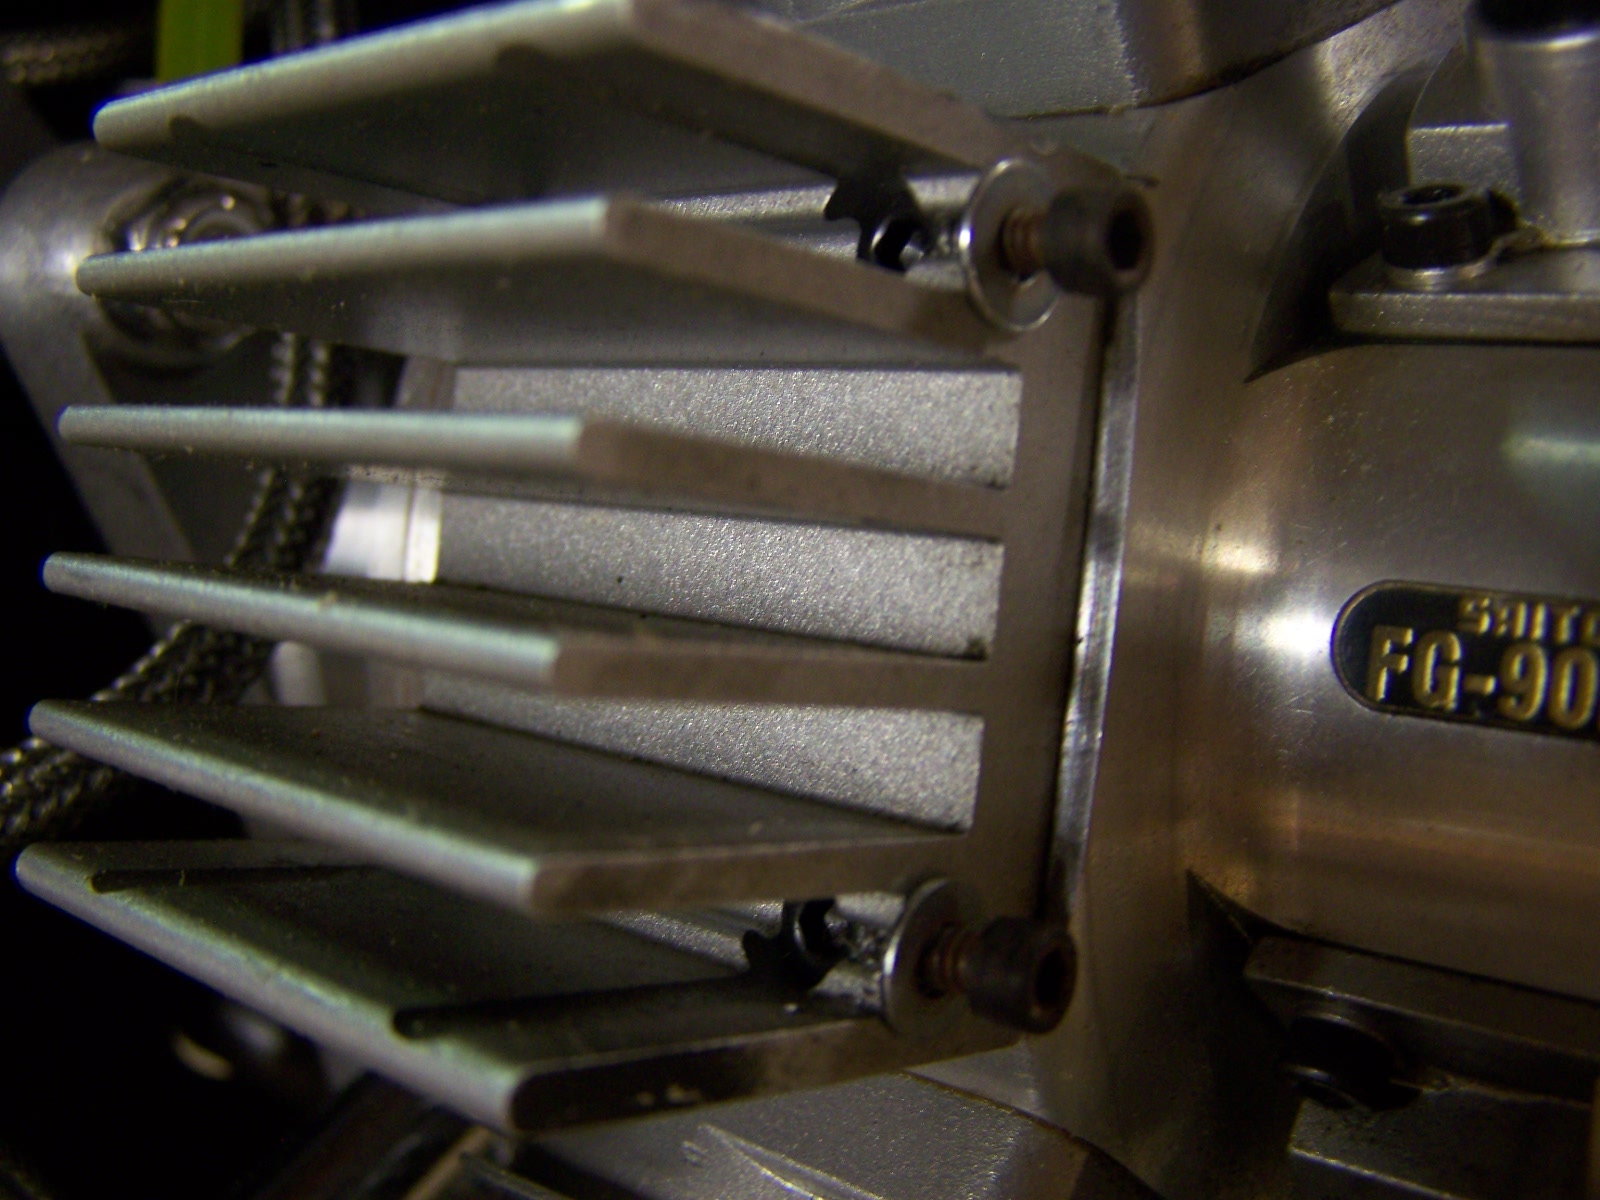


Anyone else put one of these engines in a Ziroli AT-6? I found a short thread about one with a 450, but no details or pictures on how it was done.
 11-19-2019, 07:40 AM
#303

I used those baffles on my 93" Zero with a FG 84. Tough to get them just right. Love this idea. Very tight to engine. I believe some Full Scale planes have their baffles attached directly to the engine. Like it.
BUT, those baffles were developed by Keleo and a man named Ray English...the Saito Master. He wants the baffles slightly behind the center of the cylinder not in front. I think around 1" back from where you have them.
As Ray explained, he wants more air to hit the front of the engine before being forced through the baffles and around the fins and heat sinks. (his actual reasoning took several minutes to explain)
He would also say a dummy engine with holes cut out is not baffling.
On my Zero, cooling was even better when I moved them further back...but not too far back...right around the piston center line.
Your idea is a real good one. Can it be modified?
best,
jim
11-19-2019, 06:59 PM
#304
My Feedback: (48)
Hey jimkron... I think you'll find most full scale air cooled engines have the "tins" (baffles) attached to the engine, but there may be some attached to the cowl too. I like doing it this way because it's a hekuva lot easier to install them and get them right where they'll do some good.
I kinda kicked myself for bothering to buy the Keleo baffles quite frankly, I coulda made them in no time! . I don't see any practical way to get them further back, but it'd be easy to add more ply right up tight to the cylinders similar to what I did on my FG-60. Making short ones (back to mid cylinder?) amounts to the same thing as moving them back come to think of it. On the 60, I have a wooden base that fits on the cam towers with a snug fit. No tools required to remove/reinstall. This 90 is not my first rodeo in the Saito radials, just the latest!
I kinda kicked myself for bothering to buy the Keleo baffles quite frankly, I coulda made them in no time! . I don't see any practical way to get them further back, but it'd be easy to add more ply right up tight to the cylinders similar to what I did on my FG-60. Making short ones (back to mid cylinder?) amounts to the same thing as moving them back come to think of it. On the 60, I have a wooden base that fits on the cam towers with a snug fit. No tools required to remove/reinstall. This 90 is not my first rodeo in the Saito radials, just the latest!
11-20-2019, 09:35 AM
#305

Everything is experimental. Each plane/cowl is different. On my Zero, baffle position and opening up the cowl flaps really helped the exiting air. On my X-Cub I played with several cooling ideas before finding one that works. Telemetry really helps figure out whats going on in flight.
Those heat sinks come off. I wonder if you could make two tiny aluminum L-brackets and attach to the side of fins rather than the front.
11-20-2019, 10:55 AM
#306
My Feedback: (48)
I don't see any reason why you couldn't do that, but an easier way might be to build a ply box similar to what I did and use a self tapping screw to fasten it between the fins of the heatsink? Build the box first, secure it, and then mount the baffle where ever you want it in relation to the cylinder.
11-20-2019, 12:09 PM
#307
For sure that might work.
I'm close to buying another warbird that the FG 90 would be perfect for. I might have to play with the concept.
Since the baffles were not attached to the cowl, how did you fill the gap between baffle and cowl?
I found some dense 1/4" foam at a local craft store that would be perfect. Simply to size, cut, and CA.
You could get this thing drum tight and still have the flex to take the cowl on and off.
just ideas.
jim
11-20-2019, 01:54 PM
#308
My Feedback: (48)
On the 60 I didn't use anything as it fits pretty close. The 90 in the Texan is a little looser, but I haven't done anything to to it yet, but I might put some short ply baffles in the cowl before I'm done. I think you'll drive yourself nuts if you attempt to get a 100% seal.
I've set the ignition timing on both engines back to 28 degrees BTDC which aids in cooling quite a bit.
I've set the ignition timing on both engines back to 28 degrees BTDC which aids in cooling quite a bit.
11-20-2019, 08:42 PM
#309
Junior Member
Join Date: Sep 2019
Location: Phoenix
Posts: 24
Likes: 0
Received 0 Likes
on
0 Posts
That was an excellent idea for attaching the baffles. Got my 90 today. Spent most of the day getting oil into it. Marvel Mystery. I think I can get it to fit in my TF Corsair, inverted anyway. Now I�m just concerned with the weight to balance everything out when it�s done.
11-21-2019, 08:34 AM
#310
Are you familiar with Ray English and his Saito FG 84/90 modifications?
He has modified/repaired over a 500 of these engines. He's licensed several of his mods directly to Saito. I've been to his home near Reno several times. He might have 10 Saito motors sitting in boxes or on his bench waiting for repairs and modifications.
His latest mod is a re-positioning of the magnets on the hub.
He actually moves the magnets around a 1/2". Can't remember which way.
Results are amazing. Start-up, transitions, cylinder temps, incredible RPM (mine gets over 7000) We had to put a throttle curve to prevent it going over 6600.
We flew three strait days at the recent Scale Masters without an issue. Everyone was impressed with the power and sound.
For these engines to run right, you need to baffle the motor and increase the exit air as much as possible. It's all about the flow. (yes, I'm old)
Also, I run Optima 95 octane gas at 15:1 oil mix.
11-21-2019, 05:14 PM
#311
My Feedback: (48)
Yes.. I'm very familiar with Ray English and his mods to the Saito radials as well as Mr Morris in England The ignition timing problem was originally seen by Morris and his mod also compensates for the crank phasing and is the one I use. I've always used 100LL @ 15:1. I'm debating about modifying to a neg pressure crankcase, but things are running quite well on the 60. I haven't run the 90 enough yet to see what it needs. I know it's a little slow to get #3 firing, but once lit it's a beast. He (English) is more than likely moving the set pin on the drive hub 1/2 inch CW to retard the timing?
7 grand is pushing it! Sounds like you need more prop.
I'm old too.... good flow makes for a good day every day! LOL
7 grand is pushing it! Sounds like you need more prop.
I'm old too.... good flow makes for a good day every day! LOL
11-21-2019, 05:57 PM
#312
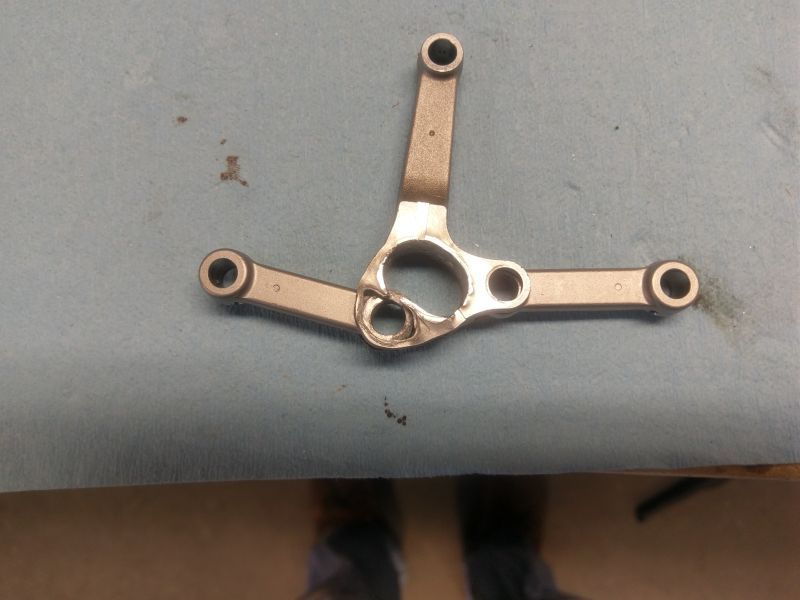
FG90R3 main rod failure due to engine over rev in flight.
This is what happens with an FG90R3 when the RPM is set to 6800rpm on the ground and you go flying and use full throttle on a slight descending bank. It may not happen on the first or tenth flight but it will happen, the engine will eventually over rev and cause the main rod to fail...!!
11-21-2019, 06:47 PM
#313
Junior Member
Join Date: Sep 2019
Location: Phoenix
Posts: 24
Likes: 0
Received 0 Likes
on
0 Posts
I fired up the 90 today for its first run. Only ran it for about 10min. Followed the instructions, mostly. 15:1 oil, 100 octane non methanol it started right up after a few flips. My question is I tried to unscrew the needles(L, and H) to what was in the directions prior to start but the low speed needle literally falls out at 4.25 turns out and I�ve got the high at 6.5-7.0 turns out. Instructions want 5 out on the L needle. ?? Ran great. I didn�t take it above 1/2 throttle but it even idled ok. I mean of course the occasional miss and both cyl 2&3 were hotter. Also I had it inverted. Figured I�d try it that way until I rotate it. Planning on inverted in the Corsair. Thoughts? Still waiting on rpm tach to arrive and trying to decide on a cylinder temp sensor to go with.
11-21-2019, 08:03 PM
#315
Junior Member
Join Date: Sep 2019
Location: Phoenix
Posts: 24
Likes: 0
Received 0 Likes
on
0 Posts
I think it will fit in the cowl better because of the offset. Plus I�d already made plans to have the throttle servo on the other side. Otherwise more work to relocate it. So the LS needle I�ve unscrewed to where it falls out and then in 1/4 turn. The high speed seems like there is no out limit.
11-21-2019, 08:05 PM
#316
Junior Member
Join Date: Sep 2019
Location: Phoenix
Posts: 24
Likes: 0
Received 0 Likes
on
0 Posts
Also I checked all of the tappets prior to running and 2 were off by a hair. I�m sure it would�ve run but I don�t want unnecessary gremlins running around. I do that on my own.
11-25-2019, 09:43 AM
#318
Junior Member
Join Date: Nov 2019
Posts: 6
Likes: 0
Received 0 Likes
on
0 Posts
Hi
i own a FG90R3 since a few days.checking all accessories, i found that the joke bar and the carburator bar was missing. the joke bar has a 3,5 mm thread which is very difficult to get in Europe/Austria
My question now: What does this joke bar exactly do with the carburator? The same as when I fuly close the throttle? Do i need it? What is the best way to get this engine running without a starter only with hand flipping.
Hints are appreciated
Christian
11-25-2019, 12:49 PM
#319
Junior Member
Join Date: Sep 2019
Location: Phoenix
Posts: 24
Likes: 0
Received 0 Likes
on
0 Posts
Hi Christian
Personally I haven�t found the choke bar very useful. I still have mine on it�s test stand and only have about a tank run through it. The carburetor bar is what you�re REALLY going to need. I use it A LOT! But all it is is a 6 inch piece of 4-40 music wire with an extremely fine notch in the end to fit in the slot inside the low and high speed adjustments. I originally mistook the choke bar adjustment with the set screw for the low end needle. It goes in the same hole but has to come out to be able to use the low speed adjustment. Which it�s not supposed to be there anyway after the engine is running. I have been hand starting mine. There have been a few times where I had to do a lot of flipping but it was because I had forgotten to turn off the kill switch or something else that was my fault. Otherwise it starts up right away and so far I�m very impressed with it.
Personally I haven�t found the choke bar very useful. I still have mine on it�s test stand and only have about a tank run through it. The carburetor bar is what you�re REALLY going to need. I use it A LOT! But all it is is a 6 inch piece of 4-40 music wire with an extremely fine notch in the end to fit in the slot inside the low and high speed adjustments. I originally mistook the choke bar adjustment with the set screw for the low end needle. It goes in the same hole but has to come out to be able to use the low speed adjustment. Which it�s not supposed to be there anyway after the engine is running. I have been hand starting mine. There have been a few times where I had to do a lot of flipping but it was because I had forgotten to turn off the kill switch or something else that was my fault. Otherwise it starts up right away and so far I�m very impressed with it.
11-25-2019, 12:54 PM
#320
Junior Member
Join Date: Sep 2019
Location: Phoenix
Posts: 24
Likes: 0
Received 0 Likes
on
0 Posts
Hi Christian
Personally I haven�t found the choke bar very useful. I still have mine on it�s test stand and only have about a tank run through it. The carburetor bar is what you�re REALLY going to need. I use it A LOT! But all it is is a 6 inch piece of 4-40 music wire with an extremely fine notch in the end to fit in the slot inside the low and high speed adjustments. I originally mistook the choke bar adjustment with the set screw for the low end needle. It goes in the same hole but has to come out to be able to use the low speed adjustment. Which it�s not supposed to be there anyway after the engine is running. I have been hand starting mine. There have been a few times where I had to do a lot of flipping but it was because I had forgotten to turn off the kill switch or something else that was my fault. Otherwise it starts up right away and so far I�m very impressed with it.
Personally I haven�t found the choke bar very useful. I still have mine on it�s test stand and only have about a tank run through it. The carburetor bar is what you�re REALLY going to need. I use it A LOT! But all it is is a 6 inch piece of 4-40 music wire with an extremely fine notch in the end to fit in the slot inside the low and high speed adjustments. I originally mistook the choke bar adjustment with the set screw for the low end needle. It goes in the same hole but has to come out to be able to use the low speed adjustment. Which it�s not supposed to be there anyway after the engine is running. I have been hand starting mine. There have been a few times where I had to do a lot of flipping but it was because I had forgotten to turn off the kill switch or something else that was my fault. Otherwise it starts up right away and so far I�m very impressed with it.
 11-25-2019, 02:41 PM
#321
Hi
i own a FG90R3 since a few days.checking all accessories, i found that the joke bar and the carburator bar was missing. the joke bar has a 3,5 mm thread which is very difficult to get in Europe/Austria
My question now: What does this joke bar exactly do with the carburator? The same as when I fuly close the throttle? Do i need it? What is the best way to get this engine running without a starter only with hand flipping.
Hints are appreciated
Christian
i own a FG90R3 since a few days.checking all accessories, i found that the joke bar and the carburator bar was missing. the joke bar has a 3,5 mm thread which is very difficult to get in Europe/Austria
My question now: What does this joke bar exactly do with the carburator? The same as when I fuly close the throttle? Do i need it? What is the best way to get this engine running without a starter only with hand flipping.
Hints are appreciated
Christian
I found the best way is to use a starter. My cold engine lights up in 2 seconds. I let the engine idle for :30 seconds or until the cylinder temp get up to 130. (I have telementry)
I then slowly bring up the throttle to full. Usually hit around 6500 rpm on ground. Don't push it. Go fly have fun. The rest of the day it's usually one hand flip.
For those breaking the Saito FG 90, the first 30 minutes or so should be at idle or less than 2000 rpm. Don't rev it up. If it runs like **** don't worry. Make sure the cylinders are all hot and working. You just want the oil, cylinders, and pistons to break in according to master Ray English. I've seen him do this many times. He gets it going outside, then goes in the house and has lunch. He might let the engine cool down. Then start it up again. Now the tuning begins.
11-25-2019, 09:03 PM
#322
Join Date: Jan 2007
Location: Dubai, UNITED ARAB EMIRATES
Posts: 500
Likes: 0
Received 2 Likes
on
2 Posts
The choke rod is very useful. It doesn�t close the �butterfly�, it opens up the low speed/idle jet, allowing fuel into the venturi, while the throttle is in a closed position.
it�s not as effective when the engine is breaking in and not tuned properly, but when it is tuned, it works very well.
When working properly, all the radials are very easy to hand start.
it�s not as effective when the engine is breaking in and not tuned properly, but when it is tuned, it works very well.
When working properly, all the radials are very easy to hand start.
11-26-2019, 12:53 PM
#324
The choke bar works great and is very useful when starting a cold engine. With the choke bar installed and the ignition switch turned off, hand flip the prop 8-10 times, then remove the choke bar, set the throttle to a high idle, turn ignition switch on and hand flip the prop. My engine will always start on the first or second flip after using the choke bar. If the engine is still warm I never have to use the choke bar, the engine will start with a hand flip or two. The FG90 starts easily, sounds great, and pulls like a freight train.
Roger
Roger
The following users liked this post:
HAPolack (10-24-2021)

